PICKLE CREEK RANCH
  • Home
    • Contact
  • Cheryl In Texas Art
    • Pixels - Art Prints
    • Fine Art America - Art Prints
    • Redbubble - Art Prints
  • Photography
    • Cheryl's PIXELS page
    • Cheryl's FINE ART AMERICA page
    • Cheryl's REDBUBBLE art
  • Essential Oils
    • Nature at its Best
    • Resources
    • Our Founder - D Gary Young
    • Product Line
    • Monthly Promos
    • Young Living News
  • The Ranch
  • Blog

The Blog Page

Communicating about essential oils, nature, photography, chickens and inspirations along the way.


YLEO SIGN UP

Poblano Pepper Powder

1/3/2016

1 Comment


Poblano Pepper Powder
by Cheryl L. McClure

Picture


News Flash!!


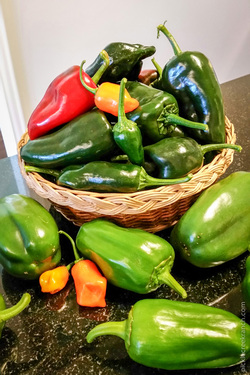
I have found that my favorite pepper to cook with is a poblano!! This picture shows my poblanos plus an orange habanero in there too, just for color! I will use the habanero to make garlic-pepper tea to use in my garden this year.

Last spring, I planted a banana, bell pepper and a  poblano pepper plant on the south side of the house in the flower bed making an edible landscape. I wish I had taken a picture when it finally grew tall, about 4 ft. and was full of poblanos. It was slow growing at first since we had lots of rain and then it was so hot last year and we had a period of drought. But wow, when the temps changed and it got a break, it took off and produced an abundance of peppers!


Read More
1 Comment

Green Tomato Weekend

11/24/2015

4 Comments


Green Tomato Weekend and
Chicken / Green Tomato
Crock Pot Chili

by Cheryl L. McClure

Picture
What to do with all those green tomatoes? I asked and got some great ideas from my friends on Facebook, thank you! There's fried green tomatoes, chicken/green tomato chili, salsa verde, and other various relishes to make.

The first thing to do is separate the tomatoes that are turning pink. Set those aside to ripen and either blanch and freeze or use right away.

We had a freeze coming so I had to get  to work. And fast! So, not only did I harvest tomatoes, I had poblanos, bell peppers, banana peppers, habanero peppers, sage, oregano, basil and mint!! Whew!


Picture
I have a regular dehydrator so I use that. One day, I will grow up and get an Excalibur, but for now this will do! I sliced and seeded the poblanos, bell peppers and habaneros (which I will use in the spring for garlic-pepper tea). After I filled the dehydrator, I saved out some poblanos for roasting.

The herbs are easy, just take the leaves off the stems, wash and spin in a salad spinner. Lay out on a paper towel and dry in the microwave. I zap them in 2 minute intervals watching and checking til I see that they're dry. The sage did not crush by hand so well, so I crushed it in the magic bullet and made a nice powder out of it. Then label and store all these in glass jars.

Since I wanted to make Chicken Tomatillo Chili (using my green tomatoes instead), I had some thinking to do and get it all straight in my head first. What to chop, what to roast, what to freeze after roasted, what to dehydrate, what to freeze after slicing flat. Now that I've typed it out, I know why it took me so long to figure it all out! LOL

First I have to tell you that the little Patio Container Tomato Bush I bought at Wal-Mart, put out consistently all summer long. They weren't the prettiest tomatoes, but I found that when I pulled them just as they started to turn pinkish, they wouldn't split as bad. They were great in salads, on sandwiches and I even made some for pasta sauce.

So if you want to try this one, look for Bonnie Plants - Patio Container - Determinate. And plant it in your flower bed!!
Picture
Any who, here's what I did and what you could do:
  • Wash and sort small tomatoes for roasting, larger for freezing raw for fried green tomatoes.
  • Cut the ends off each tomato, make two or three medallion slices about a quarter inch thick and then quarter. Till it fills the bowl.
Picture
Picture
Next:
  • Add about 3 or 4 large cloves of minced garlic crushed with the Pampered Chef garlic crusher. (these are the best, btw!)
  • Pour a little olive oil - maybe a tablespoon or so - onto the tomatoes.
  • Stir it all together in the bowl and then dump onto the cookie sheet to make one layer. I roasted two pans at a time.
For the whole roasting process, I ended up chopping and preparing tomatoes, onion and poblano. I wanted to preserve some roasted poblano in the freezer as well as using some poblano and onion in my chili.
  • Roast at 375 degrees for 15 minutes, take out and flip it all over and then put back in for another 15 minutes.

Picture
I got so excited about making my chili I put half the pan full of tomatoes and part of the poblanos in the food processor and THEN remembered to take the picture.

Done with that part!

  • After it all cooled, I labeled 1/2 quart freezer bags and stored tomatoes to use later for soup, chili or Salsa Verde.
  • For the rest of the larger tomatoes, I sliced the same way but did not chop. Tops and bottoms off, then sliced the middles to make about a quarter inch medallions. These, I laid out on a cookie sheet with foil and froze flat so they would not stick together so much when I put them in a freezer bag.

Picture
Peppers are so pretty and since I had a few bell peppers and banana peppers left, I decided to halve and seed them, brush with olive oil and roast. Then I froze them flat to keep in the freezer. These, I will be able to take out later and top with a meaty Italian tomato sauce and cook for dinner.
Chicken/Green Tomato Crock Pot Chili
Last but not least, I finally got to my Chicken Green Tomato Crock Pot Chili. I found two recipes online that I liked and adapted to make my own.
  • Roasted, Half a pan of chopped green tomatoes (or 7-8 medium green tomatoes)
  • Roasted, 2 poblanos
  • Roasted, 3 cloves of fresh minced garlic
  • Roasted, 1 medium sweet onion, chopped
  • Two crock pot cooked chicken breasts, chopped
  • Chicken broth from crock pot ( or 4 cups chicken stock)
  • Extra water to cover
  • 1 can green chilis
  • 2 tsp. Cumin
  • 1 tsp. Coriander
  • 3 tsp. dried Cilantro (fresh is better)
  • 1 tsp. White Pepper
Picture
After roasting the veggies, put them in a food processor and pulse till smooth.
Chop the chicken and combine everything into the crock pot. Set to highest setting for about an hour, then reduce to low for an hour or two. I cooked mine for about 4 hours. We had so much left over that it's better every day that we heat it up! Add a drop of lemon or lime essential oil for added flavor! See my page and check it out here> Essential Oils

I hope you find something useful here. Maybe you too, will find that there really IS something you can do with green tomatoes!!

Have fun!
Cheryl

#greentomatoes #chili #peppers #freeze # dehydrate #youngliving #essentialoils #crockpot
4 Comments

Easy Oiling - Make your own Nitey Nite!

11/11/2015

0 Comments


Easy Oiling
Make your own Nitey Nite!

by Cheryl L. McClure

Picture
One of the things I love about Young Living essential oils is the variety of oils to choose from! There are so many with different constituents and each has their own little special characteristic. Like the coolness of Peppermint and the soothing effects of Lavender.

I can choose to use one or two or several to make my own special blend. My man was telling me how he was ready to just crash and go to bed one evening. It had been a trying day, with fixing a trailer, herding cows together and loading them up to move to another pasture.  I wanted to make sure he was comfortable, relaxed and peaceful when he went to bed that night so I gathered my oils and started putting one after the other on his back, drop by drop on the spine and shoulders, adding Ortho Ease to spread it around and make the oils go further. I chose oils that would support body systems like the nervous system, for relaxation and the muscular system which would help with tension or those pesky periodic muscle aches. There is a great website called www.innerbody.com where you can really see how different body systems work!!
The next day, I decided to make up a blend and put it in a 10ML roller bottle. Here's what I used:
8 drops of each:
  • Wintergreen
  • Peppermint
  • Aroma Siez
  • Valor
  • Lavender
  • Cedarwood
  • Copaiba
  • Frankincense

and then I filled it the rest of the way up with Ortho Ease. EASY!!
Picture
Ortho Ease is even great by itself to soothe tired muscles.
I was more than happy to make his own special blend since he slept so well the night before and commented on how nice it was. How could I NOT make it!! :)

If you think about what body systems you want to support, you can combine those oils for sure! Also, it's nice to blend oils that smell good and create a relaxing atmosphere.

If you want the best oils on the planet IMO - and ones that can not compare, visit my page> http://picklecreekranch.com/essential-oils.html.

You can buy one oil at a time or get a really good deal with a Premium Starter Kit! (See Best Bang for Your Buck). And holler at me if you need help! That's what I'm here for!

Happy Oiling!
Cheryl L. McClure


#essentialoils #youngliving #relaxation #nighttime #sleep #muscles


Picture
0 Comments

Using Essential Oils Around Chickens

11/6/2015

0 Comments


Using Essential Oils Around Chickens
by Cheryl L. McClure

Picture
Let's face it, we all have off days, right? Even our pets do. Even our chickens do!!

Our poor hen, Lucy was looking pretty sad one day. I had been watching her and realized she was NOT feeling well. And my other half asked me how did I know?? Well she just wasn't acting right. She was going off and sitting by herself and not getting out to mingle or peck or scratch or anything! Her comb and waddle were both pale - almost white!! I wasn't sure what was going on. Her poop had become yellow and pasty and stuck to her feathers.

We thought she was egg bound so we did what the "Chicken Chick" suggested, and we put her in a warm bath and tried to get her to relax. 

Read More
0 Comments

Diffusing Essential Oils

9/22/2015

0 Comments


Diffusing Essential Oils
by Cheryl L. McClure

Picture
Don't you love the smell of flowers when you are walking through a rose garden or the scent of a sweet almond bush or even spearmint or lavender when you brush against it? Hmmm, how about fresh oranges??? Gotta love it!

I used to have candles galore but have eliminated almost all of them, only saving some for power outages or for decoration and ambiance. I'm done with any type of commercial spray air fresheners or waxy plug-in type candles with chemical "fragrance", opting in for a more natural approach to scenting my home.

Using any type of essential oil diffuser in the home not only makes it smell wonderful but it can add health benefits into the air that I breathe. Since I am using pure therapeutic grade essential oils (and a pure carrier oil with a reed diffuser), I'm not bringing harmful chemicals into my home. That being said, I still want to be sure to keep diffusers away from children and pets especially because they could be messy if they get tipped over!
Picture
By far, my new favorite plug-in diffuser is the Dewdrop Diffuser which is available by itself or in a Premium Starter Kit through this link> Young Living. These operate strictly with filtered water and pure therapeutic grade essential oils. I have additional diffusers for different rooms, including a Sain Sonic which sends the vapor out at an angle rather than straight up. These are both excellent ways to introduce essential oils into our home.

Make Your Own Reed Diffuser

Have you ever wanted to make your own diffuser? This type of diffuser is not at all overpowering so it's better for very small areas, like on my desk or in a small bathroom. So, I decided to experiment and make my own Reed Diffuser and share how you can make one too. This is also perfect for gift giving!!

Actually, I was thinking that for skin care, you could use it as a dispenser because the reeds could act as an applicator. You would use the carrier oil and oil of choice that is good for skin care, like Lavender or Frankincense. Then when you turn the reeds over just allow some of the oil to drip on your hands and apply where desired. Just leave out the alcohol and you will have a pure mix on hand and a little scent to go along with it.

Picture
Here's what to use:
  • Small glass container. I had a little glass Braniff decanter from years ago!
  • 6 rattan reed diffuser sticks. (Links for items can be located at the bottom of this page.)
  • 1/4 cup pure sweet almond oil (carrier oil).
  • Optional teaspoon of rubbing alcohol (90%).
  • 20 drops of essential oils. Find the purist essential oils> HERE.

Add your carrier oil, (alcohol if desired) and essential oils to the container and stir thoroughly.

Place diffuser sticks into container and let sit several hours till the oil starts to wick up, then flip. You will want to continue to flip the sticks and stir every few days to refresh and then replace the sticks when the scent has diminished.

Scent combinations

Picture
There are so many possibilities!! What's your favorite single oil? If you prefer a blend, mix it up with equal drops of each to make 20 drops total. Add a few more if you want it stronger.

Calming combinations:
  • Lavender + Cedarwood + Peace & Calming
  • Lavender + Roman Chamomile + Vetiver
  • Frankincense + Vetiver
  • Roman Chamomile + Bergamot + Frankincense

Uplifting combinations:
  • Cinnamon + Orange + Clove
  • Rosemary + Purification + Orange
  • Thieves + Citrus Fresh
  • Peppermint + Orange

Fall/Winter combinations:
  • Idaho Blue Spruce + White Fir
  • RC + Eucalyptus
  • Clove + Orange + Cinnamon
Notes:
There may be a common misconception about diffuser sticks, at least in my opinion. I thought bamboo skewers would work but they didn't because the way bamboo grows, it stops the oils from wicking up past each node.


I finally had success when I used rattan reeds. So, do yourself a favor and use rattan diffuser reeds! I got mine through Amazon and was very happy when they were delivered sooner than I thought they would.

Picture


This is what I started out with but then decided to use a smaller vessel for my diffuser. The larger container would use a half cup of Sweet Almond Oil.


The best vessel for your reed diffuser is one where the opening is smaller than the bottom. This will slow evaporation. You could check at thrift stores or you might already have something that you can repurpose saving more $.
Picture


This is what I ended up with after looking around for something I already had - two choices of styles and different sizes.

A larger vessel, of course will require more oil and longer sticks, so just do the math to fill your larger diffuser. You will want the sticks to be at least twice as tall as the entire container.

Different carrier oils could work as well, like fractionated coconut oil or safflower oil. The oil just needs to be light enough to carry the essential oils with it up the reed. Note that olive oil or jojoba oil may be heavier and will take longer to saturate. (I wouldn't try that). I'm too impatient for that so here I am with Sweet Almond Oil. :)

Other Diffusing Ideas

Picture
  • Use dried flower petals or lavender and after the fresh scent is gone you can add drops of your favorite essential oil to stir in and revive the smell. I have a whole glass pot of rose petal leaves that works great for that! And then I have my handy little spade to stir it with.
  • I have not tried this but I read that using water in place of the carrier oil is another alternative to try with your reeds in a reed diffuser. If the scent is not sufficient, you could always put that mixture in a little spray bottle and use as an air spray! I do that anyway with Purification and water. Works like a charm when our dog shows up smelling like a skunk!! He's really good about getting into skunk trouble!
  • Try adding a cup of rice in a bowl and add some drops of pure essential oil to it. Catch a whiff of the scent as you walk by.
  • Diffuse essential oils into your clothes by adding a few drops to your wool dryer balls. They will come out of the dryer smelling fresh!
  • Sew a five inch fabric square. Add rice and 10-15 drops of essential oils, then sew it up. After setting a hot plate or a hot cup of coffee on it, the heat makes the scent disperse into the air.
  • Put that same square filled with rice and EOs in your car! I have used one of those on the dash of my car and when the sun shines on it, it releases the scent. If you really wanted to be industrious, sew a zipper in, to access the rice and replenish the oil.
                       If using any citrus oil, be mindful that it does not come into contact with plastic.

Get creative and come up with different ways to disperse your essential oils into the air. Have fun and enjoy!! 

Happy Oiling!
Cheryl @ Pickle Creek Ranch

#essentialoils #youngliving #reeddiffuser #diffuser #DIY #MYO #Braniff #rosepetals #rice #air

Amazon doesn't charge you extra when you use the following links, but I may be compensated a little if you buy through my links here! That's great for both of us! Thank you!
0 Comments

Longhorns at the Pound?

9/9/2015

2 Comments


Longhorns at the Pound?
by Cheryl L. McClure

"What did you do this weekend?", is what someone might ask us if they are curious about what we did at the ranch. Well, have you ever heard a response like, "We picked up a Longhorn from the pound."?

But before I tell you THAT story, I just have to say, we had a baby bull that very same morning! Jan Paul walked up just after it was born and we were able to hang around long enough to see him get on his feet and get welcomed to the herd. Never a dull moment, and this one was very special since this cow lost her first calf last year. We were so happy to see that she delivered and all was well before we went off to the pound.....
Picture
Picture
I like to tell stories and this one, I thought was sad in some ways, funny in others. Jan Paul's son was fortunate to have met someone looking to re-home their three Longhorns and he has a wonderful place in Oklahoma for them to roam. He had some cowboys meet up to load and deliver them but ran into a few complications. The first one, a steer, had no trouble entering the trailer; the second one, one of the females, spooked, jumped a fence, did a nose dive and embedded her long horns into the dirt. When she flipped herself over, the horns broke off. She is ok now but I can only imagine that had to have hurt!! The third was going to have NO part of this and jumped one fence, then the next and kept on running. Hence, a fellow rancher was able to contain her long enough for the Collin County Animal Services to come pick her up.
Picture
Are we there yet??????
That's when we got invited to Junior's ranch in Oklahoma, via a trip by the pound to pick up Clara Bell! The folks there were really good with her but even though they gently prodded her up to the trailer, she did not want to go in and tore up a pretty large size of fence panel. Then she ran back to the corral she was being held in. Those of us watching were, uhhh, backing up ourselves!!! The men prodded her back out to the lane, kept pushing her toward the trailer with a fence panel but she would back them up over and over till she finally decided to go into the trailer. By then, Clara Bell was not a happy camper and it was a bumpy ride for us in the truck with the trailer seemingly bouncing all over the place. I took her picture when we stopped for gas in Oklahoma.  I thought I heard her say "Are we there yet?"
Picture
Once we arrived she was set free on the property but in a fenced area. The other two Longhorns were off in another part of the ranch unknowing that their partner in crime had arrived. I went to check on her after a while and she was gazing across the pasture at the neighboring cows on the other side of the fence.
Picture
All's well that ends well. We are happy to report that Clara Bell has reunited with the other two Longhorns and they are enjoying peace and quiet at the Oklahoma ranch.

#countryliving #longhorns #oklahoma #cows
2 Comments
<<Previous
Forward>>
    Picture

    Cheryl L. McClure

    Young Living Distributor
    #1176855

    I have retired from the corporate world and now enjoy keeping chickens, ducks, working in the garden and cooking more than ever before!

    More below...

    Categories

    All
    Art
    Bathroom
    Birds
    Butterflies
    Cats
    Chickens
    Cleaning
    Community
    Cooking
    Decor
    Diy
    Ducks
    Edible Landscape
    Essential Oils
    Fire Starters
    Free
    Gardening
    Healthy
    How To
    Instant Pot
    Local
    Make Your Own
    Nature
    NETT
    Rainwater
    Ranch
    Savings
    Tools
    Travel
    Volunteering
    Young Living


    ​Blog Posts:
    PV Assistant
    Malabar Spinach
    ​Throne Scents
    Clean House
    Shrimp
    Weight Management
    Black Swallowtail
    Gluten Free Brownies
    Mint Tea
    Hummingbirds
    Minty Cabbage Slaw
    Respiratory Support #1
    Respiratory Support #2
    Respiratory Support #3
    How to Move a Greenhouse
    ​But I'm So Cute!
    Raised Bed Gardening
    NETT Cleanup
    Exercise at the Ranch
    DIY Chicken Treats
    DIY Fire Starters
    Poblano Pepper Powder
    Green Tomato Weekend
    MYO Nitey Nite EO rollon
    Essential Oils and Chickens
    ​Diffusing Essential Oils
    Longhorns at the Pound?
    What's in your Trough?
    Using Rainwater at the Ranch
    Raindrop with Young Living
    Young Living Price Comparison
    Young Living - Beginner Tips
    The Essential Oil Bottle 
    Sage Essential Oil
    Ear Support and EOs
    Crape Myrtle Surprise
    Quick Cat Shelter
    Chemists's Perspective on YL
    The Athlete
    Chicken House Reveal
    Campus Health
    Concentration
    Accidents and Essential Oils
    Young Living Farms
    Kid Scents Collection
    Itchy Skin
    ​Probiotic - Life 9
    Turmeric and AgilEase
    Enjoying the Harvest
    ​
    Diffusing the Ocean Breeze
    The Lavender Farm
    An Ounce of Prevention
    Traveling with Essential Oils
    The North Sulphur River
    DIY Bleach
    Reflection of Tears
    ​MYO Lotion Bars - DIY
    Zucchini Boats
    Instant Pot Cilantro and Lime Rice
    Instant Pot Zuppa Toscana Soup
    Fresh Guacamole Please!
    Instant Pot Tomato Sauce
    Honey Lavender Lemonade
    Honey Lav/Lemon Ice Cubes
    Tools For The Garden
    Veggie Tian from the Garden

    Archives

    November 2024
    August 2024
    May 2024
    April 2023
    December 2022
    July 2022
    June 2022
    March 2021
    January 2021
    November 2020
    September 2020
    August 2020
    July 2020
    May 2020
    February 2020
    August 2019
    March 2019
    January 2019
    May 2018
    February 2018
    December 2017
    August 2017
    July 2017
    June 2017
    May 2017
    February 2017
    January 2017
    October 2016
    August 2016
    July 2016
    June 2016
    May 2016
    April 2016
    March 2016
    February 2016
    January 2016
    November 2015
    September 2015
    July 2015
    February 2015
    January 2015
    November 2014
    October 2014
    September 2014
    August 2014
    July 2014
    June 2014

    CONTACT INFO
    It's probably pretty obvious I love nature and art. Nature and landscape photography is a part of everyday life at the ranch. There are some pieces available as works of art that I would like to share with you!

    I only recommend Young Living essential oils because I am confident in their purity and the quality of their essential oils and other products. I am not a doctor. The information I post on this website is for educational purposes only. Young Living supplements are designed to improve nutrition; they are not intended to diagnose, treat, cure, or prevent any disease. However, scientific research has established a connection between nutrition and we all know better nutrition leads to better health.

    Please consult with the medical professional of your choice whether using essential oils or not. Remember that being proactive and taking responsibility for your health is in your own best interest. Dig in, research and make wise choices. I encourage you to see what others have done with essential oils and supplements by visiting Oil-Testimonials at http://www.oil-testimonials.com/.

    I hope that this website and blog will provide you with helpful information and resources to achieve your desired goals!!
    ​
    Feel free to contact me if you have questions or concerns as I am here to help and hopefully point you in the right direction!​

    RSS Feed

    Go to> • Home • Cheryl In Texas Art • Photography •  Essential Oils • The Ranch • Blog
Web Hosting by iPage
All photography and graphics crafted by Cheryl L. McClure • does not include iPage template